.jpg?table=block&id=c1024f52-7960-4dc6-b927-2af59c3b2c76&cache=v2)
Table of Contents
- Creating the EC2 instance
- Installing Caddy on Your EC2 Server
- Setting up DynamoDb
- Creating IAM Policy for DynamoDB Table Access
- Creating IAM Role for EC2 Instance Access
- Implementing Domain Authorization in Caddy
- Creating the API Endpoint
- How It Works
- Configuring Caddy with the Caddyfile
- Creating a Daemon for Caddy and Starting the Service
- Pointing Your Domain to the Caddy Server
- Scaling this architecture
This guide will detail how to offer a custom domain feature to your SaaS product using Caddy. It will allow your customers to use their own
mydomain.com when using your product, instead of the generic mydomain.yourproduct.com. This article is inspired by this article from Jack Ellis, but simply provides more details.I will be explaining how to setup Caddy, on an AWS ec2 instance using a DynamoDB database to store the SSL certificates created.
Creating the EC2 instance
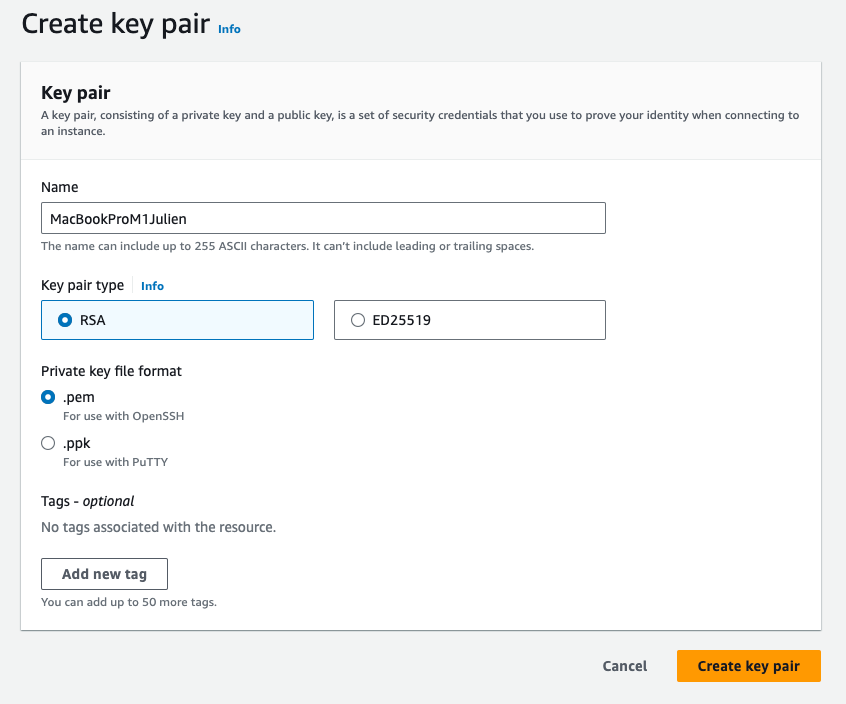
Before configuring Caddy for custom domain support, create and securely store an EC2 keypair:
- Access AWS EC2 Dashboard: Visit AWS EC2 Dashboard - eu-west-3 Region and navigate to 'Key Pairs' in the 'Network & Security' section.
- Generate Keypair: Click 'Create Key Pair', name it appropriately, and download the generated
.pemfile.
- Secure Storage: Save the
.pemfile in a secure location, such as a password manager or encrypted storage.
- Set Permissions (Unix-based systems): Use
chmod 400 your-key-name.pemto restrict access to the file.
- Backup and Monitor: Keep a backup in a separate secure location and regularly audit keypair usage.
After creating your EC2 keypair, the next step is to set up an EC2 instance and an Elastic IP:
- Launch EC2 Instance:
- Visit the EC2 Launch Instance Page.
- Select the latest version of Ubuntu.
- Choose
t3.smallfor the instance size, sufficient for a proxy server. - Use the previously created keypair for secure access.
- In network settings, enable HTTP and HTTPS traffic.
- Create and Associate Elastic IP:
- After launching the instance, create an Elastic IP. This ensures a static IP address for your instance, preventing changes upon reboots.
- Associate this Elastic IP with your new instance.
- SSH Connection:
- Connect to your instance via SSH. Click the 'Connect' button on your EC2 instance page to get the specific SSH command.
- Use the command format:
ssh -i "yourkeyname.pem" ubuntu@yourserveraddress.comfor secure access.
Installing Caddy on Your EC2 Server
Here's how to install Caddy with
xcaddy on your EC2 server, specifically to integrate the DynamoDB plugin:- Switch to Root User:
- Enter
sudo suto gain root access.
- Update Package Lists:
- Run
apt-get update.
- Install Necessary Packages:
- Execute
sudo apt install -y debian-keyring debian-archive-keyring apt-transport-https.
- Add xcaddy's GPG Key:
- Run
curl -1sLf 'https://dl.cloudsmith.io/public/caddy/xcaddy/gpg.key' | sudo gpg --dearmor -o /usr/share/keyrings/caddy-xcaddy-archive-keyring.gpg.
- Update System Packages:
- Perform another update with
sudo apt update.
- Install Go 1.20:
- Create a directory with
mkdir goinstall && cd goinstall. - Download Go with
wget https://go.dev/dl/go1.20.linux-amd64.tar.gz. - Extract it using
tar -xvf go1.20.linux-amd64.tar.gz. - Move Go to the system directory:
mv go /usr/local. - Set environment variables:
export GOROOT=/usr/local/goexport PATH=$GOPATH/bin:$GOROOT/bin:$PATH.- Verify the installation with
go version.
- Install xcaddy:
- Use
sudo apt install xcaddy.
- Build Caddy with DynamoDB Support:
- Build Caddy using xcaddy:
xcaddy build --with github.com/silinternational/certmagic-storage-dynamodb/v3.
- Move Caddy to System Directory:
sudo mv caddy /usr/bin/.
- Verify Installation:
- Confirm the DynamoDB plugin installation with
caddy build-info | grep "dynamo".
This process ensures Caddy is installed with the necessary DynamoDB support, preparing your server for custom domain configuration.
Setting up DynamoDb
Setting up DynamoDB for managing SSL certificates with Caddy involves a few key steps:
- Create DynamoDB Table:
- Open DynamoDB in the AWS Console.
- Create a new table named
caddy_ssl_certificateswith a primary keyPrimaryKey. - Opt for on-demand capacity (no free tier but auto-scales).
- Enable Point-in-Time Recovery:
- After table creation, go to the 'Backups' tab and enable 'Point-in-Time Recovery'.
- Create IAM User for Table Access:
- The next step involves creating an IAM user specifically for accessing this DynamoDB table.
Creating IAM Policy for DynamoDB Table Access
- Create IAM Policy:
- Go to the IAM Policies Creation Page.
- Choose DynamoDB and select 'All Actions' or specify actions if you're more experienced.
- Add the table ARN from the DynamoDB page to specify access to the
caddy_ssl_certificatestable. - Name the policy
AccessToCaddySSLDynamoTable.
Creating IAM Role for EC2 Instance Access
- Create IAM Role:
- Navigate to Create IAM Role.
- Select AWS service, choose EC2 for the use case.
- Attach the
AccessToCaddySSLDynamoTablepolicy.
- Assign Role to EC2 Instance:
- In the EC2 dashboard, go to your instance's 'Actions' > 'Security' > 'Modify IAM Role'.
- Select the
Ec2AccessToCaddyDynamoTablerole.
This setup ensures your EC2 instance can securely access the DynamoDB table, which is critical for managing SSL certificates with Caddy.
Implementing Domain Authorization in Caddy
When integrating Caddy into your SaaS infrastructure, it's crucial to ensure that SSL certificates are generated only for your customers' domains, preventing unauthorized users from exploiting your services. To achieve this, you'll need to set up an API endpoint that Caddy will consult to verify if a domain is authorized. Below, I'll detail the process using a simple implementation inspired by an example from Laravel News.
Creating the API Endpoint
- Define the Route in Laravel:
- Edit your
routes/web.phpfile to define a new route that points to a specific controller method. For instance: - This creates an endpoint that Caddy can query, passing the domain as a query parameter.
Route::get('caddy-check-8q5efb6e59', 'CaddyController@check');- Implement the CaddyController:
- Create a controller,
app\Http\Controllers\CaddyController.php, to handle the logic: - This controller maintains an array of authorized domains. When Caddy makes a request to this endpoint, the
checkfunction determines if the domain is in the list of authorized domains. If it is, the function returns a 'Domain Authorized' response; otherwise, it aborts the request with a 503 error.
<?php

namespace App\Http\Controllers;

use Illuminate\Http\Request;
use Illuminate\Support\Facades\App;

class CaddyController extends Controller
{
    protected static $authorizedDomains = [
        'portal.my-customers-website.com' => true
    ];

    public function check(Request $request)
    {
        if (isset(self::$authorizedDomains[$request->query('domain')])) {
            return response('Domain Authorized');
        }

        // Abort if there's no 200 response returned above
        abort(503);
    }
}
How It Works
- Caddy's Verification Process:
- When Caddy receives a request to generate an SSL certificate for a domain, it first calls this API endpoint.
- It passes the domain in question as a query parameter to the endpoint.
- The API checks against the list of authorized domains. If the domain is found, it confirms authorization by returning a 200 HTTP response. If not, it denies the request.
- Security Benefits:
- This method ensures that SSL certificates are only generated for domains belonging to your customers.
- It prevents unauthorized users from pointing their domains to your infrastructure and receiving SSL certificates.
- Flexibility and Control:
- The list of authorized domains can be dynamically managed within your application, allowing for easy updates and administration.
By integrating this API endpoint with Caddy, you effectively control which domains can utilize your SSL certificate generation service, enhancing the security and integrity of your SaaS offering.
Configuring Caddy with the Caddyfile
To configure Caddy on your server, you'll need to edit the Caddyfile, which is Caddy's configuration file. Here's how to do it:
- Open Caddyfile for Editing:
- Use
nano /etc/caddy/Caddyfileto open the Caddyfile in the nano text editor.
- Caddyfile Configuration:
- Here's a template for the Caddyfile. You'll need to replace the placeholders (marked as TODO) with your specific details:
jsonCopy code
{
    on_demand_tls {
        # TODO: change this to your endpoint check URL
        ask https://yourdomain.com/caddy/ask-certificate/your-endpoint
    }

    storage dynamodb caddy_ssl_certificates {
        # TODO: change this to your AWS region
        aws_region your-aws-region
    }
}

:80 {
    respond /health "I'm healthy!"
}

:443 {
    # TODO: change with your email
    tls your-email@example.com {
        on_demand
    }

    # TODO: change with your SaaS domain
    reverse_proxy https://your-saas-domain.com {
        header_up Host your-saas-domain.com
        header_up User-Custom-Domain {host}
        header_up X-Forwarded-Port {server_port}
        header_up X-Real-IP {remote}

        health_timeout 5s
    }
}
- List of Things to Change:
- Endpoint Check URL: Replace with the URL of your domain authorization endpoint.
- AWS Region: Set to the region where your DynamoDB table is hosted.
- Your Email: Replace with your email address for TLS certificate notifications.
- Your SaaS Domain: Replace with the domain name of your SaaS application.
- Saving the Configuration:
- After making the changes, save the file and exit nano (
Ctrl + X, thenYto confirm, andEnter).
This Caddyfile configures Caddy to handle on-demand TLS certificate generation, reverse proxy to your SaaS, and integrate with DynamoDB for certificate storage.
Creating a Daemon for Caddy and Starting the Service
To ensure Caddy runs continuously and restarts automatically in case of a crash, you'll need to set it up as a daemon. Here's a brief guide, adapted from the instructions on naiveproxy's GitHub page.
- Create Systemd Service File:
- Start by creating an empty service file with
sudo touch caddy.service.
- Edit the Service File:
- Open the file with
nano caddy.service. - Paste the following configuration:
- This sets up Caddy to run as a service with the necessary configurations and security limitations.
jsonCopy code
[Unit]
Description=Caddy
Documentation=https://caddyserver.com/docs/
After=network.target

[Service]
User=caddy
Group=caddy
ExecStart=caddy run —environ --config=/etc/caddy/Caddyfile
ExecReload=caddy reload --config=/etc/caddy/Caddyfile
TimeoutStopSec=5s
LimitNOFILE=1048576
LimitNPROC=512
PrivateTmp=true
ProtectSystem=full
AmbientCapabilities=CAP_NET_BIND_SERVICE
EnvironmentFile=/etc/environment

[Install]
WantedBy=multi-user.target
- Move the Service File to Systemd:
- Use
mv caddy.service /etc/systemd/system/to move your service file to the correct directory.
- Start the Caddy Service:
- Reload the systemd manager configuration with
sudo systemctl daemon-reload. - Enable Caddy to start on boot using
sudo systemctl enable caddy. - Start the Caddy service with
sudo systemctl start caddy.
- Monitoring and Managing the Service:
- Check Caddy's status:
systemctl status caddy. - Reload Caddy configuration (after changes):
systemctl reload caddy.
This setup ensures that Caddy is properly managed as a system service, providing stability and reliability for your SaaS infrastructure.
Pointing Your Domain to the Caddy Server
To finalize the custom domain setup for your SaaS product using Caddy, you need to point your main domain to the Caddy server's Elastic IP. Here's how to do it:
- Update DNS Settings:
- Access the DNS management interface of your domain registrar.
- Create an A record pointing to the Elastic IP of the EC2 instance running Caddy. For example:
- Name:
domains.yoursaas.com - Type: A
- Value: [Elastic IP of your EC2 instance]
- Instructing Your Users:
- Inform your users that they can set up a CNAME record from their domain to
domains.yoursaas.com. This enables them to use custom domains with your SaaS.
- Automatic SSL Certificate Generation:
- With Caddy configured, SSL certificates will automatically be generated for your customers' custom domains, ensuring a secure and professional experience.
This step completes the process, allowing your users to seamlessly integrate their custom domains with your SaaS while leveraging the automated SSL management provided by Caddy.
That’s it! Your SaaS now has a custom domain feature!
Scaling this architecture
While this custom domain setup with Caddy and DynamoDB has proven effective, it's important to note that it doesn’t scale automatically. This means that as your user base grows, manual intervention may be required to ensure continued smooth operation. Despite this, I've been successfully running this system for over a year for a SaaS platform with more than 100,000 users, and it has remained stable and reliable without any significant issues.
@dragocrnjac, the owner of a SaaS that does all of the custom domain heavy work for you, sent more precise instructions on how to scale this on AWS:
1. Run multiple ec2 instances behind a Network Load Balancer. 2. Run Caddy in a container inside ECS for easy scaling. So in case of a spike in traffic your service stays online, and when there's not a lot of traffic it scales back to 2-3 instances so you're not spending too much money. 3. For extra points and the biggest services, run the ECS service in multiple regions and run them behind AWS Global Accelerator. AWS GL will route traffic from end-users to the closest region where your service runs.
Hope you enjoyed reading this article, and hopefully that it helped you! 👋